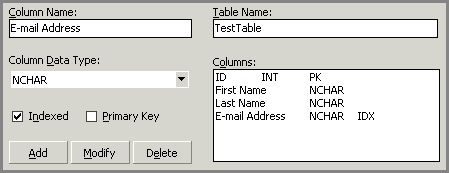
Create a new table
This screen allows you to design a single table in a database you are
creating. For each database column, you can specify its fundamental characteristics:
column name, data type, and whether it should be indexed. You can also
create a primary key.

Table Name
Sets the name of the new table.
Column Name
Sets the
name of the new column. If you click a column in the Columns list, this
text box will display the name of the selected column and allow you to
change the name of that column.
Columns
Contains a list of specified columns. When
you enter a column name, choose the data type, and press the Add button,
the new column is added to the list.
Column Data Type
Contains a list of the data types. This drop-down list has a different
set of values for each database format.
Indexed
Indicates that the wizard should create an index on a column.
Primary Key
If this check box is selected the wizard
will create a primary key column.
Adding, Modifying, and Deleting Columns
To add a new column:
1. Enter a unique name in the Column Name
text box.
2. Choose the data type from the Column
Data Type drop-down list.
3. Choose whether the column should be
indexed. Choose whether a primary key should be created using that column.
4. Press the Add button to add the new
column to the Columns list.
To modify a column:
1. Choose
a column in the Columns list.
2. Choose the data type from the Column
Data Type drop-down list.
3. Choose whether the column should be
indexed. Choose whether a primary key should be created using that column.
4. Press the Modify button to add the new
column to the Columns list.
To delete a column from the Columns list:
1. Choose
a column in the Columns list.
2. Press the Delete button.
Related Topics:
 How to create
a database How to create
a database
About designing a database
About Create Database Wizard
Creating a new database
Database file details
Transaction log file details
Completing the wizard
|